

Sometimes speaking is so much more convenient than typing. Knowing how to send a voice message on iPhone can make communication a lot faster and even more personal. Apple makes it really easy to record and send audio messages in just a few steps. In this guide we will walk you through how to send a voice message on iPhone.
We will also look at how to save audio messages, common problems and how to fix them, and what options you have to share recordings with people not using iPhone, for example Android users. Let’s get started with the basics.
How to create a voice message on iPhone
Before you send your message, you need to know how to create a voice message on iPhone. We will do it using the Messages app. This is where iMessage can be found.

Steps to record and send a voice message on iPhone
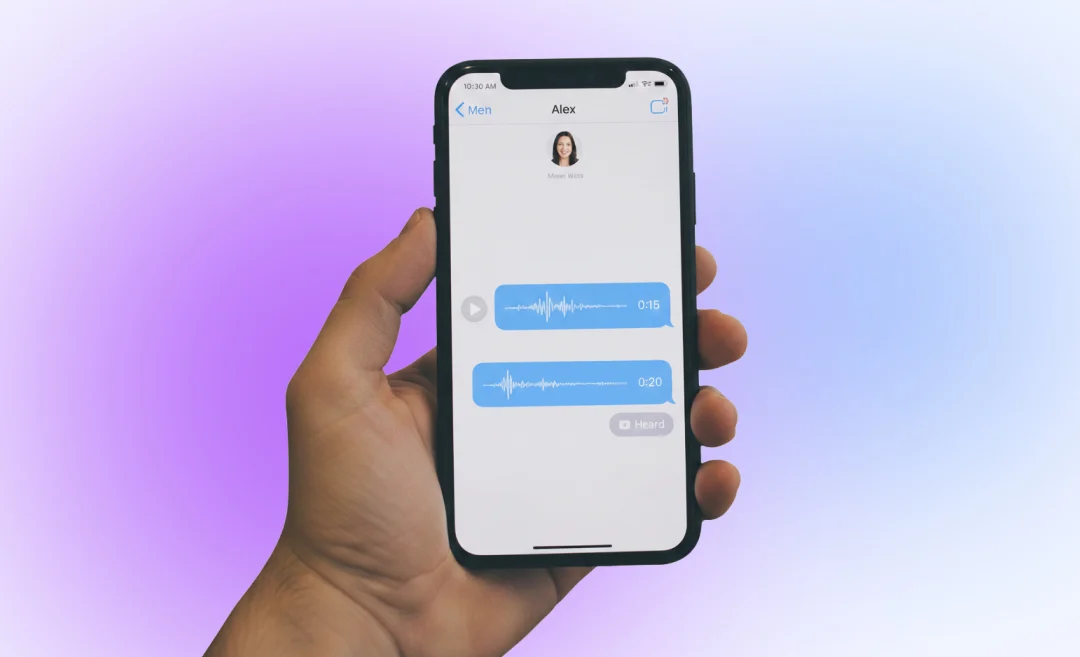
- The first step is opening the Messages app.
- Next, you can start a new conversation with someone or select the conversation where you want to send a voice message.
- Tap the “+” button next to the text field where you normally write your messages.
- Select Audio from the list of options that pops up.
- Your voice message starts recording immediately after you tap Audio, so speak your message.
- Tap Stop when you are finished.
- If you want to review your message before sending it, tap the Play button to listen to it.
- If you change your mind, tap the X to delete the message.
- To send your recorded voice message,tap the Send arrow.
![]()
Use the hold to record method to send a voice message
In the conversation, you may see a small audio wave or microphone icon next to the text field.
You can press this button and hold it to record a voice message. Release the button to send your message immediately.
This gives you a quick way to send a voice message on iPhone without calling someone.
Send voice messages regularly? Summary AI gives you the tools to convert audio to text. That way you can save time and scan your messages easily or save them for later use if needed.
How to send a voice message on iPhone with iMessage
iMessage is the way to send voice messages between Apple devices. It is accessed from th Messages app and works on iPhones, iPads, and Macs as long as you’re signed in with your Apple ID.
To send a voice message using iMessage, you have to follow the same steps as before.
- Open the Messages app on your device and choose the person or group you want to send a message to.
- Tap the microphone icon on the right side next to the text field.
- Record your voice message by holding the microphone button.
- Release the button.
You can then review the message and send it or delete it.

How to save voice messages on iPhone
Voice messages expire two minutes after being listened to by default. To keep messages, you have to tap Keep below the message after sending or receiving it. Messages that you have saved by tapping Keep remain in the conversation until you manually delete them.
You can also save voice messages to Files or Notes. If you want the voice message outside of Messages, you have to tap and hold the message. Select Save or Share, then choose where you want to save it: Files, Notes, or another app. This is a useful way to save messages if you want to organize recordings for school or work.
For longer voice recordings, you can use the Voice Memos app. We’ll cover that next.
How to send a voice message on iPhone with Voice Memos
The Voice Memos app which comes with your iPhone is a better option for sending longer recordings than iMessage. Voice Memos lets you record audio and then share it easily as you would share any other file.
Follow these steps to create a Voice Memo on iPhone:
- Open the Voice Memos app on your device
- Tap the red Record button to start a recording
- Tap Stop when you are finished
Send your Voice Memo by tapping the recording you want to share and selecting the Share icon. Choose where you want to share it, in this Messages, then select a contact and tap Send.
Using Voice Memos is best for sending longer messages, especially if your recording is longer than two minutes.
Voice messages best practices
Make your voice messages clear and effective by keeping them short and clear. Avoid long rambling messages, because they are not convenient for others to listen to, defeating the purpose of having this option to send messages.
Make sure to speak clearly so your voice message is easy to understand. Always check audio quality and use the mic on your earphones or an external microphone when needed.
Wind and other noisy things around you can make recordings difficult to hear. Ensure that you are not surrounded by anthing that may be distracting for the recipient.
Can’t send voice messages?
Sometimes you can run into problems when trying to send voice messages on iPhone. Here are some common issues and how to fix them:
Why you can’t send voice messages
- Make sure iMessage is on by going to Settings – Messages – iMessage.
- Check internet connection because you need Wi-Fi or cellular data to send iMessages.
- If you have issues and you have already checked the settings, try restarting your iPhone.
Recording or sending doesn’t work
- If you are having trouble recording, make sure your microphone is enabled by going to Settings – Privacy – Microphone – Messages.
- Make sure that your device is updated to the latest iOS version.
- Try closing and reopening the app.
Voice messages delete automatically
By default, your audio messages are deleted after 2 minutes after listening to them. You can tap Keep right below the message to save it permanently until you delete the message manually.

Sending voice messages to non-iPhone users
You can’t send voice messages via iMessage to recipients on a device other than an iPhoone. For example, iMessage voice messages will not work on Android.
In this case, you can use the Voice Memos app to record an audio message and then share it via email, WhatsApp, or another app.
Convert audio to text with Summary AI
Sending voice messages on your iPhone is fast and really easy once you know how to do it, whether you do it through iMessage or Voice Memos. You can save your messages as well and if you need to do more with your voice messages, tools like Summary AI are here to help.
If you often use voice messages for your work, Summary AI can convert your iPhone audio messages into clear text. This makes it easier to review, share, or save important info. That way you can save a lot of time and you don’t miss any key details from conversations.