

If you want to know how to screen record on a Chromebook, you can choose between more than one recording option.
The Chromebook allows you to record full screen, or part of the screen, or even just a specific window. This guide walks you through all of the options of recording your screen.
You will also learn how to screen record on a Chromebook with audio, how to stop screen recording, where your files are saved, and even a few tips to improve the quality of your screen recordings.
How to Screen Record on Chromebook Using a Keyboard Shortcut
Other than using screen recording software, the fastest and easiest way to start a screen recording on a Chromebook is using a keyboard shortcut.
To start recording, press:
Ctrl + Shift + Show Windows
Where is the Show Windows key? The Show Windows key looks like a small rectangle with two vertical lines on the right side. You can find it located on the top row of your Chromebook’s keyboard.
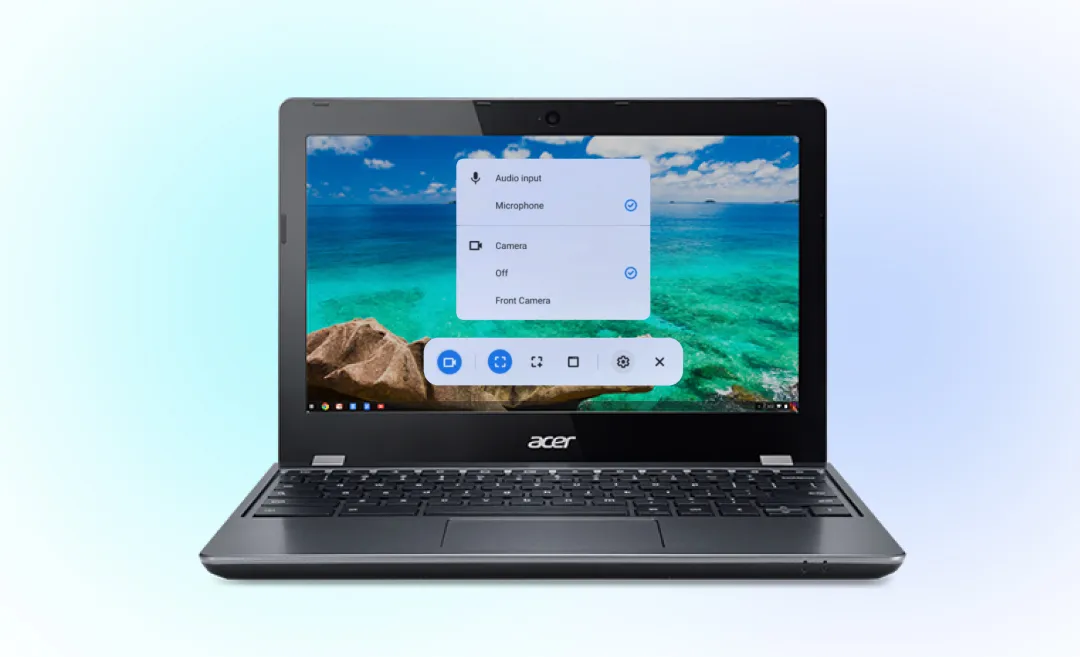
When you use this shortcut, the screen capture toolbar appears at the bottom of your screen.
- When the toolbar appears, click the video camera icon.
- Choose from three options: full screen, partial screen, or window.
- Click anywhere on the screen to start a screen recording.
Afterwards a short countdown will appear, and then recording begins.
How to stop screen recording on Chromebook
To stop screen recording on a Chromebook, click the red “Stop” button in the bottom right corner of your “shelf.”
You can also use the keyboard shortcut to stop recording:
Search + Shift + X
Note: If you use an Acer Chromebook, this shortcut works the same way.
How to Record Your Screen on Chromebook With Screen Capture
Screen recording is included as part of the screen capture tool in Chrome OS. For more info, take look at the official Help Center.
There are two main ways to open it. You can either use the keyboard shortcut or you can open it from “Quick Settings.“
Screen capture lets you do three things: You can either take a still image, create a GIF, or you can record a video. A screen capture is a .png image file, while recording your screen creates a .webm video file.
How Do You Screen Record by Using Quick Settings?
You can also open the screen recorder from “Quick Settings.”
- Find the settings button in the bottom right corner of your screen.
- Open “Settings”
- Select “Screen capture.”
Now you can choose your recording type. You can choose full screen, partial, or window.
How Do You Record Full Screen?
To record full screen, including everything on your display:
- Open the screen capture tool.
- Click the “Screen capture” icon.
- Select the full screen option.
- Click anywhere on the screen to begin.
This option creates a recording of your entire desktop, including your shelf.
Note: The shelf on your Chromebook is the row of apps at the bottom of your screen. If there’s an app or a web page that you use frequently, you can pin it to the shelf so you can access it quickly next time.
How Do You Record a Partial Screen?
If you only want to show part of your screen:
- Open the screen recording tool.
- Choose the partial screen option.
- Drag your mouse to select the area you want to record.
- Select whether you want to record video or create a GIF.
How Do You Record a Window on Chromebook?
You also have the option to record just one window:
- Open screen capture.
- Click the video icon.
- Choose the window option.
- Click the window you want to record.
This option records only the window you clicked, not the full screen of your desktop.
How to Record Screen on Chromebook With Audio
If you want audio in your video, you have to choose a different setting.
- Open screen capture.
- Click the gear icon.
- Turn on the microphone setting.
- Start recording.
This allows you to record on Chromebook with sound using the built in microphone.
To record a video with audio, you can choose from these options:
- Device audio
- Microphone
- Device audio and microphone
If you do not enable audio first, your video will be silent.
Note: GIFs don’t capture audio input.
How to Find Your Screen Recordings on Chromebook
After you end a screen recording on Chromebook, your file is automatically saved. You have different options of accessing these saved files. Let’s take a look at where they are saved by default and how you can access them.

Where Are Chromebook Screen Recorded Videos Saved? By default, recordings are saved in the “Downloads” folder as WEBM files.
To access screen recordings from the Downloads folder:
Open the “Launcher” in the left bottom corner or by pressing the launcher key. (Under the tab key)
Open “Files.”
Go to “My Files.”
Click “Downloads.”
Your video will be named “Screen recording” and the date and time. This is the default setting for naming new screen recordings.
You can also sort by date modified to quickly find the latest file added to the folder.
Another way to access screen recordings is using the notification tab. Right after you end a recording on Chromebook, a notification appears in the bottom right corner. You can click “Show in folder” to open the Downloads folder/file location.
You can also access the file from the “Tote”, another Chromebook feature. You can find the Tote on the shelf near Quick Settings. It shows a preview of your most recent files. Click to open your latest recording.
Can You Edit Screen Recordings on a Chromebook?
The built-in Gallery app has a few simple editing tools and you can resize images with it, but you can’t use it to edit videos.
To edit, you will need third party apps. The same goes for converting your video. The easiest way to convert WEBM files into MP4 format is using online converters.

Tips for a Smooth Screen Recording on a Chromebook
Here are tips to make sure your screen recording is the best it can be:
- Close extra/unneeded tabs before recording so they don’t clutter your recording
- Clean up your desktop so it looks nice
- Test your microphone audio to make sure the audio quality be satisfactory
- Use the partial screen recording to hide things you don’t want to show in your recording, like more clutter
- Make sure you have enough storage space before starting your recording
Note: If you see the message “can’t record protected content Chromebook,” it means the system blocks you from recording copyrighted video. (e.g. streaming platforms)
If you do not see the screen recording options mentioned in this article, you may be using an older version of Chrome OS. Update your system in Settings and try again.
Save Time With Summary AI
Now you know how to screen record on the Chromebook! Whether you use screen recording for tutorials, school projects, presentations, or something else, you now know how to record full screen, a partial area, or a single window.
You also learned how to record screen on Chromebook with audio by enabling the microphone setting and stop recording with a button and a shortcut.
If you create screen recordings often, you should consider converting them to text. That way, you will have a searchable text version that you can use to save time with.
Use Video-to-Text from Summary AI to quickly convert your screen recordings into written notes and create searchable transcripts from recordings